Showing posts with label COMPUTER-TRICKS. Show all posts

Thursday, 31 October 2013

A Complete Guide on How to Extend Your Laptop's Battery Life

For many of us our laptop is an indispensable part of our lives and is carried to work and back every day. However, nearly everyone knows the frustration of needing to do three or four hours' worth of work and only having an hour's worth of battery life left without a charger in sight! There are some ways to prolong the life of a laptop's battery, especially if your laptop is one of the new sleek and simple design, yet exceptionally powerful modern laptops, such as the new range of Samsung laptops.

Best Tips to Increase your Laptop Battery Life:

Reduce Screen Brightness:


From a purely physical point of view the biggest power draw on a laptop is the screen display. Reduce the brightness of the screen to the lowest level that you can comfortably work at. Do not sacrifice your eyes for the sake of an extra half-an-hour of battery life, but do reduce the screen brightness as much as you feel able to.

Reduce Sound and use Headphones:


When watching videos or listening to music on your laptop reduce the sound as much as possible, even if you are using headphones. Not only does this conserve your battery, it can protect your hearing too!

Turn Off Wifi and Bluetooth:

Software can play a part in draining battery levels, and the worst offender is Wi-Fi. Modern laptops are designed to hunt around for Wi-Fi signals and can use an inordinate amount of battery power to do so. If you are travelling from home to work or vice versa and do not need to be connected to the Internet, then disable the Wi-Fi acquisition feature for the journey. This will prevent your laptop from hunting for access points that you have no intention of using anyway!

Remove USB and CD's when not in use:

If you are working during your commute to and from the office, try not to keep USB devices connected for long. Flash drives, optical CD drives and even USB mice can all drain power from a laptop, so plug them in, transfer information or do the tasks you need to, and then remove them as soon as you are finished. (It is not advised to try and use optical disc drives while travelling anyway, a sudden bump or jolt can damage the mechanism.)

Close Unwanted Applications which are not in Use:

If you open multiple windows in your browser or if you are using multiple softwares at a time then more power will be consumed from the battery.Close unwanted programs in use ,this will increase the battery life span.

Unplug the Charging when Battery is full:

Charge your battery until its full and once its full unplug the charging and use it until upto 80% then again recharge it.

Reduce the number of Startup Programs:

Reducing the number of startup programs not only increases your batter life but also increases the speed of your computer.
Go to run then type msconfig and there you can manage the start up programs.

Replace your Old Battery with a new one:

Finally, if your battery is over two years old, it may simply be getting old. Speak to the manufacturer about purchasing replacement batteries and ask if they offer long-lasting replacement batteries that hold a longer, stronger charge than the original one. Laptops are there for our convenience and to be used, but with a little care and attention your battery can last much longer, giving you a great user experience!
Do let us know if we have missed anything in your comments.

Wednesday, 2 October 2013

How to Reset Google Chrome, Opera, Internet Explorer ,Mozilla Firefox to their Default Setting's

Every one in the world use browser's to surf internet , some times we are required to do changes in the browser setting's according to our needs as in one of the post on our blog we shown you How to Increase Mozilla Firefox Browsing and Startup Speed in that post we have done some changes to browser's setting's but what will happened if  we do some changes and that went wrong in that position we will think to re-install our browser , if we do re-install we will lost all our saved data like bookmarks , saved passwords any more things.So in that case there should be a way to reset our browser to its original setting's without affecting the browsers data.So in this post we will see how to reset all the four major browsers.

How To Reset Mozilla Firefox

Mozilla Firefox is one of the most popular browser of all over the world ,  it provide many great addons which can used to enhanced the capability of the Mozilla Firefox.It is the most customisable browser , but some time customisation can went wrong , so in that case we need to reset it .Let see how to do that. 1.) First click on orange button on the top left most then click to help then finally click on reset with Add-Ons disabled (See the below image).
It will ask you that you are sure that you wan to restart disable all Add-Ons and restart click Restart . 2.)Now firefox will restart ,and two option will pop up to either start mozilla firefox in safe mode or reset firefox , so choose reset firefox .
That how you can reset Mozilla firefox setting's now let see how to reset opera setting's.

How To Reset Opera

Opera is also use by many users , opera doesn't provide functionality to reset it through GUI so we need to delete its preference files . Lets see how to reset it by deleting it preference file. 1.)Open opera and in address bar type opera:about  and then hit enter ,see below image
2.)Now in the opened window copy the preference path till 2nd opera ,see below image.
3.)Now paste that in run window(Winkey+R)  to open that opera directory,see below image.
4.)In that directory now find operaprefs file and delete that and then restart your opera ,see below image.
That it now your opera setting's are again set to default , now let see how to reset setting's in google chrome.

How To Reset Google Chrome

Google Chrome have many best extension similar to Mozilla firefox which increase the capability of google chrome but recently Google Chrome updated to its newer version which included many new inbuilt functionality like open recent closed tabs as we seen in Mozilla firefox and more feature is to reset google chrome settings to its default ,lets see how to do this in google chrome 1.) Go to Google chrome setting's page and on that page click on show more setting's , see below image.
2.)Now scroll down to the end of the page and you will see the option to reset browser setting's ,click on that button ,see below image.
That it now your google chrome is reset to default settings of chrome, now lets see how to reset internet explorer.

How To Reset Internet Explorer

Internet explorer comes pre installed with windows many user use it as there default browser , but some time some changes to settings make it unreliable for user so in that case we should at least once try to reset internet explorer before choosing other browser over it.So lets see how to reset internet explorer. 1.)Click on Tools and then click on Internet options to open settings page in internet explorer see below image.
2.)Now click on Advanced Tab in opened box and then below you will see a option to Reset internet explorer for more detail please look at the below image.
That's all about on reset browser setting's if you have any query please do comment and don't forget to subscribe and follow blog.
About the Guest Author :Sudhir Dudeja is a graduate in computer engineering in his free time he does blogging and write on Technology Tips,Tricks and Tutorials article on his blog.Why not check his blog OhoTech.com

Thursday, 26 September 2013

How to Check if a Website is Down Just for you or Everyone

  • Sometimes you notice many sites not opening in your browser.This commonly happens with the popular social networking sites like Facebook,Twitter ,Stumbleupon etc.But you might be in a doubt whether if the particular site is down for just you or else everyone?
  • Whether the site which you are trying to open not opening just for you or else everyone?
To find this there are some online tools readily available.In this article I will be sharing couple of them to check if the site is down for all or just you.

1.IsItDownRightNow.COM:

  • Now this will show you a message if the website is up or down.
Twitter lookup using isitdownrightnow

2.Down for me or everyone:

This is one more interesting tool which shows if a website is down for just you or everyone.

Check the Up Time of Some Popular Websites:

Here is one more tool which constantly checks if a site is up or down.Go to website downrightnow.com ,this website collects the data of some popular sites like Twitter ,Facebook ,Blogger and Livejournal.This tool also shows if there is any maintenance downtime going on for popular websites.

Conclusion:

With the above listed websites you can find if the site is down for just you or everyone.If the site is down for just you then it might be your browser problem or you might have blocked the site or sometimes it might be the problem with your ISP(Internet Service Provider).There are many sites to find this but the listed are best sites.Do let us know if you have any doubts in your comments.

Monday, 8 April 2013

How to Reveal Hidden Passwords (Asterisks) in Web Browsers

Remember the situation, signing into your account with just a single click because browser is saving all your passwords for you. We know this is convenient but since you’re not typing your passwords any-more, eventually you’ll forget your password in a few days.  For security reasons, the password field in all browsers is masked with “asterisks” which won’t allow any third person (even you) to read the origi-nal typed password. But, what if you want to reveal the string behind the asterisks? There is actually few workaround for revealing the original passwords behind the asterisk and over the entire course of this article we’ll be discussing some known ways to reveal the characters behind the asterisks in different browsers.

Reveal Passwords Behind Asterisks or Dots in Different Web Browsers:

Google Chrome:

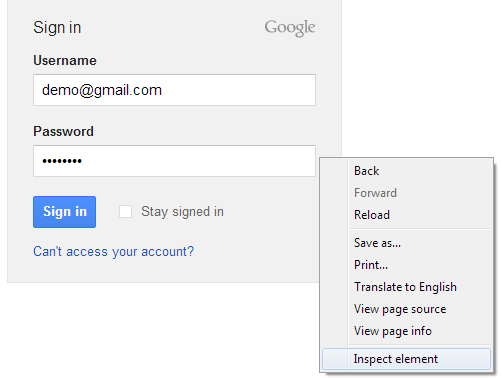
Starting off with Google chrome, the easiest way to reveal the original passwords behind the asterisk is using inbuilt Inspect element feature in the browser.
  • You just need to right click on the password field in the browser where you will get an option "Inspect Element". 
  • After clicking on it, "Web Inspector" will open out and there you can see some code which is basically Html code and you just need to replace the "password" word with "text" word and it will reveal the words behind the asterisks.

There’s another way using JavaScript which is quite quick and easy as compared to above method. Just open a site that allows users to login and after typing the password, just enter the following JavaScript code in the address bar.
Javascript: alert(document.getElementById('Passwd').value);
After entering the above code in the address bar, press enter and it will pop up a window with your password written on it.

Mozilla Firefox:

The Next most common browser is "Mozilla Firefox".
  • The chrome's "Web Inspector" trick is also applicable in Firefox.
  •  Open a site that asks for login (like Facebook), right click on the password field in the browser where you will get an option "Inspect Element". After clicking on it, "Web Inspector" will open out and there you can see some code which is basically Html code and you just need to replace the "password" word with "text" word and it will reveal the words behind the asterisks as shown in screenshot below.
Apart from this, there’s another way which is quite quick and easy as compared to above method. For that you’ve to create a bookmark with the following JavaScript code as URL in it.
javascript:(function(){var s,F,j,f,i;s="";F=document.forms;for(j=0;j<F.length;++j){f=F[j];for(i=0;i<f.length;++i){if(f[i].type.toLowerCase()=="password")s+=f[i].value+"\n";}}if(s)alert("Password is:\n\n"+s);else alert("No passwords");})();
After saving this as a bookmark, open a site that allows users to login and after typing the password, open the saved bookmark by clicking on it and it will pop up a window with your password written on it.

Opera:

Next comes the "Opera" in that you can use "Dragonfly", which is an in built tool, to reveal the words behind the asterisks just like chrome's "Web Inspector". Open a site that asks for login (like
Facebook), right click on the password field in the browser and select "Inspect Element" option. After clicking on it, "Dragon Fly" will open out and you’ll see some code which is basically Html code and you just need to replace the "password" word with "text" word and it will reveal the words behind the asterisks as shown in screen shot below.

Internet Explorer:

In the same manner you can apply this trick on Internet explorer. First of all open any site (Gmail in our case) that allows user login. Now for bringing out “developer tools” press the f12 key. A new window will be opened and press Ctrl+B to enable selection of elements. After that go to login page and select the password field, doing this will take you to the password field’s code in developer window (highlighted by yellow). Now, you just need to replace the "password" word with "text" word and it will remove the asterisk mask in the password field, see screenshot below.
Apart from this, there’s another way which is quite quick and easy as compared to above method. Just open a site that allows users to login and after typing the password, just enter the following JavaScript code in the address bar.
alert(document.getElementById('Passwd').value);
After entering the above code in the address bar, press enter and it will pop up a window with your password written on it. (See pic below)

Wrap Up:

Although there are so many tools out there to help you in revealing the words behind the asterisks and to get the saved passwords with in a browser, you still need to keep your system safe and protected by using "Antivirus" plus "Firewall" to avoid stealing of these passwords by someone who have access to your system. If you can use these tools to reveal your saved passwords then others can also use the same ways to get information of yours.

Sunday, 3 March 2013

A Complete Guide To Laptop Operating Systems

When you buy a laptop these days you are not just buying a machine. You are buying the software that runs the machine. Years ago, there weren't many choices. Almost all consumers went with a Windows laptop. Some loyalists would choose Mac, while hardcore computer users might choose Linux. Through the years that has changed drastically.

More people than ever are buying Mac laptops. Windows comes in many forms, including the new Windows 8. There are tons of different Linux builds. Then there are the specialty operating systems. Google has released the Chrome OS for its Chromebook line. Android, too, powers many laptop-like devices. The choices are no longer straight forward.

If you're looking to buy a laptop, or just want to become more familiar with the options available, this guide will show you the way.

List of all Major Laptop OS with their PROS and CONS:

Mac OSX

While it runs on less than 10 percent of all personal computers, Mac OSX has grown drastically in the last ten years. Fed up with Windows, many people have turned their attentions to Mac OSX on both desktops and laptops.

Pros:
  • Ease of use. Everything in OSX is relatively straight forward, making it easy to understand even for novice computer users.
  • Efficiency. OSX is designed to correct itself, reallocating memory in order to run in the most efficient manner.
  • Security. While there have been more malicious attacks on Macs in the last year than ever before, the incidents are still very rare compared to Windows PCs.
  • Media. Macs were made to work with high-resolution video and audio media.
Cons:
  • Software availability. Since about 90 percent of computer users run Windows machines, developers create more software for them. While Mac software availability has improved in the last ten years, there is still a lot more software for Windows.
  • Closed environment. PC users switching to Mac will notice that they have a lot less control over the computing experience. Macs are known for their uniform user experiences.
  • Price. Apple prices its Mac computers considerably higher than Windows laptops. Even their low-end devices cost $1,000US. Decent Windows laptops can be had for half that price.

Windows 8

The newest release from Microsoft, Windows 8 is all about cross-platform compatibility. It is meant to run not only on laptops and desktops, but also smartphones and tablets. The results have yet to be seen, but Windows 8 could be the OS that unites all of our gadgets.

Pros:

  • User interface. The user interface of Windows 8 is one of the best Microsoft has ever created. For touchscreen laptops, there is the tile view. For traditional laptops there is the classic Windows view.
  • Improvements. Since Windows 8 was just released, it will undergo many changes in the near future. Bugs will be fixed, and problems will be solved.
  • Security. Windows 8 is the most secure version of Windows yet, which will increase its appeal.
  • Range of devices. Windows 8 runs on all kinds of devices, including standard laptops, laptop-tablet hybrids, and the sleek new ultrabooks.
Cons:
  • Buggy. While improvements are coming, Windows 8 still contains many bugs that hinder the user experience.
  • Compatibility. There is some software not yet designed to run on Windows 8.
  • Gaming. While most software runs well on Windows 8, games are not quite up to speed yet.
  • Pricing. Microsoft ran a sale in late 2012, but Windows 8 pricing is back to its normal levels. You can, however, get a 90-day trial of Windows 8.
The good news is that many of the cons will go away as Windows 8 develops. It should be the best Windows by a long shot by the end of 2013.

Windows 7

After many failed releases, Microsoft finally won over the market with its Windows 7 operating system. Even though it has recently released Windows 8, Windows 7 remains a functional operating system that many users perfer.

Pros:
  • Universality. More users run Windows 7 than any other computer platform. That allows users to share tips and tricks, as well as software.
  • Gaming. While Windows 8 isn't quite up to speed yet, gamers love Windows 7. Many will not upgrade because of gaming issues.
  • Customization. Windows 7 is the most customizable version of Windows.
  • Efficiency. While not as efficient as Mac OSX, Windows 7 is an efficient operating system.
Cons:
  • Support. Since there is a new version of Windows to support, Windows 7 won't receive the same level of support from Microsoft that it has in the past.
  • Development. With more and more people installing Windows 8, developers will start focusing on that OS.
  • Upgrading. Again, it will cost a lot to upgrade to Windows 8. Buying a Windows 7 laptop now means paying that upgrade cost in the future.

Chrome OS

In 2009 Google announced a new OS, called Chrome OS. It is based on their Chrome web browser, and it runs web apps instead of traditional apps. While Chromebooks got off to a slow start, they made progress in 2012. Google recently released the Chromebook Pixel, its most advanced model yet.

Pros
  • Speed. Because Chrome OS contains few bells and whistles, it runs web apps faster than traditional laptops.
  • Simplicity. Everything in Chrome OS is straight forward and easy to use, even for novice PC users.
  • Essentials. Chrome OS contains essentials for web browsing and web use, even for heavy and pro web users.
Cons
  • Power. Chromebooks are underpowered by design, since they require few resources. But they are sometimes underpowered, leading to issues.
  • Limited capabilities. If you want to do anything that doesn't involve direct web use, you're out of luck. Chrome OS is severely limited in what it can perform.
  • Clunky interface. Some Chromebooks feature touchscreens, but the OS doesn't seem to be designed for a touchscreen interface in the same way Android is.
  • Price. Even the low-end Chromebooks are priced too highly for what they bring to the table. The new Pixel costs $1,300US, which is more than the MacBook Air.
About Author:Joe Pawlikowski writes, edits, and consults for several tech blogs across the web. He writes about mobile gadgets and technology at his site, MobileMoo.

Sunday, 13 January 2013

How to Clear Cookies on Internet Explorer,Mozilla Firefox,Google Chrome

We spring clean our homes every once in a while to keep it free of clutter. It provides us a cleaner environment to live in. Somewhat similar to spring-cleaning your house is cookie cleaning the browsers that you use on your computer.
For the internet dummy, here’s what an Internet Cookie is: Whenever you browse a particular site, a “cookie” (or a file referencing that site, gets stored on the hard-disk of your computer. The next time you visit that site, say an online poker site for example, the browser sees that cookie and loads that website faster. You would think that this is a great function and very useful too. However, over a period of time, you surf numerous websites and web pages. The result of this is that literally cartloads of cookies get stored on your computer resulting in a slowdown. 
Thus it is important to clear out the cookies along with the internet history and the cache. Different people use different browsers to access the internet on their computers. Outlined below are the steps and screen-shots of how to delete cookies on different browsers:

Steps to Clear Cookies on Internet Explorer 9: 

  • Open browser>click the gear at the top right to access “settings” >Select “Safety”>Delete Browsing History.
  • Alternatively, press Ctrl+Shift+Delete to open the Delete Browsing History window.
  • Select “Temporary Internet Files”>uncheck all other boxes, in particular the “Preserve Favorites website data” (checking this option will delete objects from the websites that are in your Favorites folder. This is required to clear your cache completely).
  • Click the ”Delete” button at the bottom of the window.
The computer will work the request for a moment and complete the action.

Steps to Clear Cookies on Mozilla Firefox:

This browser has different steps for clearing cookies from a single site and for deleting all cookies:

Deleting cookies for a single site:

  • Click on the “Firefox” button at the top of the Firefox window( Tools menu in Windows Explorer)>Options>Privacy>Firefox Will dropdown menu>Use custom setting for history
  • Click “Show Cookies
  • The cookies window will appear >Type the name of the site whose cookies have to be deleted(a list of cookies will show up)
  • Select the cookie that needs to be Deleted >Click on “Remove Cookie
  • To select all the cookies Shift +End.

Deleting all cookies:

  • Click on the “Firefox” button at the top of the Firefox window( Tools menu in Windows Explorer)>Go to the “History” menu>select “Clear recent history”>Set the time range to clear all>click on arrow near details(expand history list)>Select “cookies” (deselect other boxes).
  • Click “Clear Now”>Close Recent History window.

Steps to Delete Cookies on Google Chrome:

  • Open Browser>Select the “Wrench” (settings menu located at top right corner) icon>Tools>clear browsing data.
  • Alternatively you can also access the “Delete Browsing History” window by pressing Ctrl+Shift+Delete or click on [chrome://settings/clearBrowserData]
  • Select “Empty the Cache” checkbox>Uncheck all other options
  • In the “Obliterate the following items from” dropdown box select>Beginning of time>Click the “Clear browsing data” button.
  • Chrome will process your request for a moment and the action will be completed.

Final Words:

Sometimes maintaining the Internet history on your browser can be helpful in that you are able to view the actual terms that were used to access a particular site. There are lot of Browser versions and the ones listed here are the latest. You can find information related to deleting cookies on specific browser websites in the “help” section. Remember that your computer is a machine and needs to be cleaned regularly to ensure optimum performance. Happy surfing!

Thursday, 10 January 2013

How to Increase Mozilla Firefox Browsing and Startup Speed

  • Are you experiencing slow speed and lagging web experience from your favourite browser- Mozilla Firefox? This generally happens after using Firefox over time. 
  • Restarting browser doesn’t help and neither restarting the computer. So how can you improve and refurbish Firefox’s declining speed and efficiency?
Well, over the due course of this article we’ll be discussing on the topic how to speed up your Mozilla Firefox? We’ve gathered some tricks and tweaks that will put your Firefox again into efficient and balanced position. And we believe, if you’ll carefully follow this guide and apply all the methods together, you’ll experience a 100% of speed increase, be it a web browsing experience, Firefox start up time or browsing speed.

Tweaks to Speed Up Mozilla Firefox Browsing:

Configuring settings in Firefox’s “about:config” option:

1) You can increase the speed by Reducing RAM required by Firefox for its Cache Management.
Follow the steps:
  • Open Firefox browser and type “about:config” (without quotes) in the address bar.
  • In the search field, look for: “browser.sessionhistory.max_total_viewer” and change its value to “0”.
2) By default at a time, Firefox makes only one request while opening a web page for you but by increasing and allowing Firefox to make several requests at a time, we can increase the page loading speed and this can be achieved by enable pipelining.
  1. Open Firefox browser and type “about:config” (without quotes) in the address bar.
  2. In the search field:
Find:  “network.http.pipelining” & change to “true” by double clicking on it.
Find: “network.http.proxy.pipelining” and change it to “true”.
Find:  “network.http.pipelining.maxrequests” and change it to 10.

Now browser will make 10 requests at once.

3) This trick involves in changing the amount of time assigned to browser it uses to act on received information and it works effectively if you’re using a broad band connection.
  1. Open Firefox browser and type “about:config” (without quotes) in the address bar.
  2. Right Click anywhere in empty portion and click New> Integer. Name the new Integer as:  “nglayout.initialpaint.delay” and assign it a   “0” value.
  3. Similarly you can create the  following values to increase speed of Firefox:
Create a new Boolean: “network.dns.disableIPv6” and set value to “false”.
Create a new Integer: “content.notify.backoffcount” and set the value to 5.
Create a new Boolean:  “plugin.expose_full_path” and set the value to “true”.
Create a new Integer:  “ui.submenuDelay” and set the value to 0.
4) Finally the last method with which you can reduce the RAM usage of Firefox when it is minimized to taskbar. This little hack will help you to free up some RAM for your system when you’re not browsing.
  1. Open Firefox browser and type “about:config” (without quotes) in the address bar.
  2. Right Click anywhere in empty portion and click New> Boolean. Name the new Boolean in the pop up as:  “config.trim_on_minimize” and assign it “true” value.
  3. Restart the Firefox.

Using Firefox extension- FasterFox:

There’s another way to increase the browsing or Internet speed in Firefox with the help of an extension/add-on for Firefox called FasterFox. It works pretty cool for me and I was able to notice some significant improvement in browsing speed. However, it won’t work well on my old computer with basic configuration.  So I won’t recommend it to users with low-configuration systems.
How FasterFox works?
  • FasterFox recycles all the useless or ideal bandwidth and utilizes it to load web pages much faster. 
Download Fasterfox Here.

Basic ways to speed up Firefox:

Remove Unwanted Addons and Pugins:

  • To decrease the start-up Firefox loading time, remove unwanted add-ons or extensions.
  • All add-ons lower the start-up loading times by fraction of seconds, therefore more the add-ons higher will be start-up loading time.
  • The add-ons or extensions that used Internet connection can lower the browsing speed, so we’ll suggest you to avoid those add-ons that use Internet connection.
Disable Unwanted Addons,Plugins and Extensions.

Clear Cookies from Time to Time:

  • Cookies, cache, history and other temporary files are also responsible for Firefox’s declining speed and efficiency. We’ll suggest them to remove all these files 2-3 times a month.

You can remove these files by going to: options>Security. Choose “clear your recent history” to wipe history and “Remove cookies” option to remove cookies. Also delete the unnecessary bookmarks.
  • There’s another small effective trick to decrease the start-up Firefox loading time. Right click on the Firefox icon and choose properties.
  • Select the target field and in the end of url “C:\Program Files\Mozilla Firefox\firefox.exe”, give a space and type “/Prefetch:1” (without quotes). Remember to put space as without specifying space this trick will not work.
All the above mentioned tweaks and tricks are fairly easy to apply. We believe these tricks will make your favourite browser at least 2-3 times much faster. Although some tricks may not work for you as some of them depends upon the configuration of your system and some upon Internet connection. Anyway, if you have any interesting working trick to speed up the Firefox, do share it with us through comments.

Some more Features Articles: