ATB in collaboration with Giztopia.com is conducting an iPad Giveaway.This is an International Giveaway which means its open for people all over the world.We will be able to ship the product to any country.
Sponsors for the Giveaway:
Giztopia is a platform to recycle your used electronics including Cell Phones ,Tablets , Laptops and MP'3 for cash.They offer highest payout in the industry with 100% customer satisfaction guranteed.
In this giveaway we are offering an Apple iPad with Retina display to one lucky winner.You can check out the full features from official website.
Winner Announced:
As promised we recorded a live video while picking up the winner to make the giveaway very transparent.
The Winner of the contest is Aleem Munawar.Though the selection process was completely random this guy has over 3000+ entries, which makes him the most deserving one.Congrats.
Skype is a powerful medium to communicate with your beloved once no matter in any part of the video.It is powerful video calling messenger using Internet.It gives freedom to call any part of the world and offers many other premium services for free.
Skype not only works on Windows but also Mac , Linux and many other Operating systems. You also can connect with your Facebook friends through Skype. See your Facebook newsfeed, update your status, comment and like direct from Skype.
Advantages of Skype Offline Installer:
With offline installer you can install skype even without internet connection.
This is the best way to install if you are trying to install the software on multiple computers.
If you have a slow internet connection then your installation may take long time.In such cases it is very much advised to go with offline installer.
Improvements made in Skype Latest Version:
They have made many improvements over the previous versions like Accessibility ,Tooltips , File sending , Localization ,Call Quality Guide etc.
Pinterest is quite viral at the moment and is inviting many users from social media and the other important platforms. The main idea behind Pinterest is to connect users over a platform where they can share the favorite videos and other important things. The growth of this app is instrumental in these times and according to the reports, the website has registered over 11.7 Million monthly unique users, which is an impressive stat. However, most of the businesses are unaware of its utility; this is the major reason for the pull back of the business. Here is our user-friendly beginner’s guide which will show the correct means and directions to the new user:
Pinterest has hosted some incredible facts about itself. The most interesting fact is that 89 percent of the Pinterest users are females. This is a great achievement for the company. According to some reports, it has been found out that Pinterest users tend to invest 89 minutes of their monthly time towards the management of their boards. In many ways, the repute of this website has been compared to the likes of facebook. There are some terms that are of immense importance when it comes to the context of Pinterest. They are:
Pin:
Any post that is shared on Pinterest is termed as a Pin. This pin is quite similar to a tweet, but the only difference lies in the media posting. A person can only post photos as a pin. Making a pin in this website is very easy, and it requires a mere click on “Pin it” button and the rest of the work is an easy affair.
A Board:
It is the collective platform for all the posts/pins that revolve around a topic. For example, there is a board for “recipes” which contains pictures of all the recipes available in the menu.
Follower:
This concept of following some is closely related to that on
Facebook and Twitter.
The Pin created by the user can be followed by anyone available on the online space.
Repin:
This feature also resembles Retweet on Twitter to a great extent.
Like:
This feature lets a user like any pin that he browses. The concept has similar buds as facebook or twitter.
Setting-up An Account:
The first step before using Pinterest is to register an account with it. This website works on the invite-only method and anyone interested in creating the Pinterest account, can request the moderators to send him the invite. The interface that follows requires the user to fill in the email details and click on “Request Invitation”.
The next step is to verify the email by clicking on the link sent by the company in order to confirm your Pinterest account.
Pinterest gives authority to the user in order to sign up enroute facebook or Twitter. Business firms always prefer signing up from Twitter as it is more business oriented Social Media.
Your Board:
A Board is the place where the sharing of Pin happens along with the posting of favorite videos. Boards also enable the user to categorize all the things he possesses. This is the major platform where all the advancements regarding the picture sharing take place.
How To Create a Board:
The process to create a Board is not complicated. It requires the user to at the top-right of page in order to choose the option, “create board”.
The next step requires the user to affix a name to the Board. This step also helps the user to categorize his media according to the requirement.
How To Pin:
After adding the board, user has to just click on the “Add” button and it reflects the option, “Add a pin”. This step initiates the process of adding a Pin to the board.
The next step is to add the URL which is expected to be posted and then the user is expected to click, “find images”.
This step will enable the interface to search for the images required and they will be searched from the article.After the completion of this step, simply click on “Pin it” and the process of adding a pin is thus complete.
About the Author - Pankaj is a blogger and a freelance writer who writes about Gadgets, Tutorials Windows at his Technology blog, Teech World.
We definitely don't know whats gonna happen the next moment.We also don't have any certainty about our lives.Anything can happen anytime even without our intention.Not many of us think about our death -especially our self.But its really important to make a proper plan about what happens after we are expired because many people might be dependent on us.
Steps to Transfer your Data to your Beloved ones even after your Death:
So,Google recently introduced a new feature called Inactive Account Managerto transfer your data to your beloved ones even after we are gone.Using this option you can transfer the whole data linked with your account like Blogger,gmail,Picassa ,Google Plus ,Drive and all other Google Services to the other person whom you choose.
Check out the Quick Video Tutorial
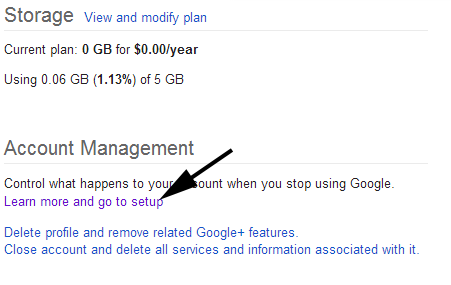
Here is the Step by Step Procedure with Screenshots:
Enter the setup ,there you can see four options namely Alert Me,Timeout period,Notify Contacts and Share Data,Optionally delete account.
Alert Me :
This option is nothing but to Alert yourself in case of account inactivity for a specific period of time.
You must add an optional email id and phone number to proceed with other steps.
Timeout period :
You can specify a timeout period after which you and your beloved ones will get notified regarding the account inactivity.
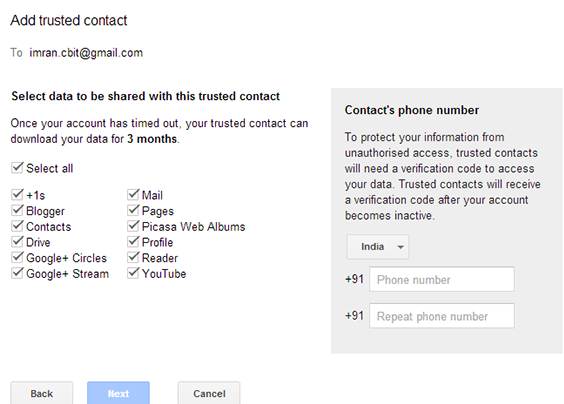
Notify Contacts and Share Data :
This is where you can add upto 10 people with whom you want to share your data.
Click on Add Trusted people.
Enter the email addresses of those people whom you want to share data with.
Then you have to choose those services whose data will be shared with those contacts.You can simply choose select all in case if you want to share the whole data.
Then you have to enter the phone number of those contacts to avoid unauthorised access.
After you enter the phone number hit next.In the next page you will get an option to send some email notification with subject and message.
Then save the whole setup.
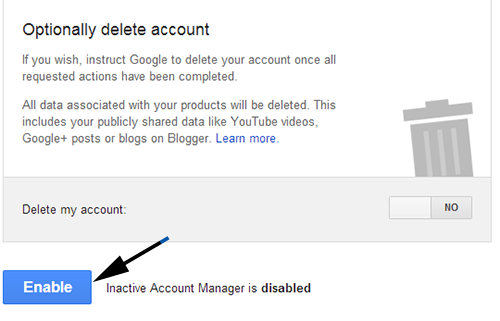
After finishing all the steps you have to Enable Inactive Account Manager which will be Disabled by Default.
Optionally delete account:
You will also have an option to delete your account if your account remains inactive for the specific timed our period.
In case you want to delete your account just turn the button ON which will be turned OFF by default.
This is a great move taken up by google to transfer your data to your beloved ones even after we are expired.If you are having any questions regarding the setup process do share your views in your comments.
Cellphones are no longer regarded as items of luxury but necessary devices. Without a mobile phone, you won’t be able to keep in touch with your family members, friends, colleagues and business associates. Discussed herein, are tips and guidelines on how to select the best cellphone.
1.Cellphone Plan
Begin by choosing a cellphone plan that you would like to subscribe to. There are generally two types of cellphone plans accessible in the market:
Postpaid Cellphone Plans: Postpaid cellphone plans allow you to utilize the service during a 30-day period after which you will be required to settle the bills accrued. When choosing a postpaid cellphone plan, you need to select a plan that you can afford to pay at the end of the month.
Prepaid Cellphone Plans: Prepaid cellphone plans require you to load your mobile phone with credits before using the services. There are no restrictions as to the amount of money that you can load on your prepaid cellphone plan. With prepaid cellphone plans, you can use your mobile phone at any given time so long as it has units in it.
2.Features
What features are important to you in a cellphone? Is your purpose for acquiring a mobile phone is to keep in touch with friends through frequent text messages? Since mobile phones are designed with a technology that enables them to also access the internet in addition to texting and calling, it is recommended that you acquire a brand with wide buttons for simple texting experience.
Other features which you need to consider when shopping for an ideal cell phone are camera, multimedia, organizer, GSM capability, Bluetooth connection, Wi-Fi and touchscreen capabilities.
3.Foam Factor
Foam factor is the other aspect that you need to keep in mind when shopping for cellphones. Thanks to improved technology, cellphones are today available in the market in different designs and shapes. The selected foam factor will mainly hinge on personal preference. For instance, you can choose to make your selection from flip, slide and full QWERTY foam factors.
4.Smartphones vs. Basic Mobile Phones
In a bid to expand their consumer base, cell manufacturers are diversifying and have introduced into the market what are commonly referred to as smartphones. These are mobile phones that offer users basic computing functions such as file transfer, office and organizer. HTC, Apple iPhone, Samsung Galaxy and Blackberry are examples of smartphones that you can easily acquire in the market at an affordable price. In case you’re buying a first smartphone in a life, take a look at low-end models, like Sony Xperia ST21i
If you are shopping for a cellphone for the first time and are confused by the wide varieties accessible in the market, it is highly recommended that you spend some time reading the various cellphones reviews published on the web. Reviews are normally published by consumers who have used different types of cellphones and as such can provide you with first-hand information in regards to the different models and brands accessible in the market. Through reviews, you will learn more about cellphone specifications and prices, which are essential in making an informed decision in respect the type of mobile phone to purchase.
If you are looking for affordability and variety while shopping for an ideal cellphone, then it is highly recommended that you use the internet to shop. At the click of a button you can view various mobile phones from different suppliers worldwide. Besides, using the internet allows you to compare the various features that come with different mobile phones.
In comparison to brick-and-mortar stores, online stores incur less overhead operating costs and as such are able to provide you with greatly discounted prices on different cellphone brands. The other reason why you need to consider using the internet when shopping for a mobile phone is the free shipping and delivery offer provided by various online stores. There are hundreds of online stores that you can use when shopping for a cellphone, for example, eBay.
In addition to the above, there are several other factors that you need to keep in mind when shopping for a cellphone. For example, what is the battery life of the cellphone you are purchasing? If you are intending to use your cellphone for various activities such as playing games and listening to music, then you need to select a mobile phone with a longer battery life. Then again, there are cellphones that come with portable chargers thus allowing you effortlessly recharge the phone after the battery has drained.
Warranty is the other thing that you need to ask when shopping for cellphones. Warranties are designed to safeguard you against flaws in manufacturing for certain duration of time. A good cellphone should come with at least a 1 year warranty.
Two weeks back we switched to a new blogger template which was a Responsive template.Responsive design is the new trend to make your web design compatible with all devices.But the results were not as we expected.The responsive design had a negative impact on our blog traffic and ranking as well.
On March 28th 2013 we decided to upgrade our template to a responsive design.The response for the design was good.I analysed the theme in all aspects whether it might be SEO,loading time and user experience and few other factors as well.But the results were different.
Till April 1st 2013 the traffic was normal.Bounce rates were decreased and time spent on the blog has increased which were good signs.
Traffic started sinking down:
The ranking started sinking down from April 2nd 2013.I thought if it was either some Algorithmic update or some penalty has raised on my blog and I started finding out the fix for this issue. Then I found that the responsive design has created duplicate content.Google started indexing both mobile version and desktop version url parameters which created duplicate content.
I was expecting an increase in ranking and traffic in the next couple of days but the results were biased.Traffic went on decreasing which you can see from the below screenshot. At that stage I was really very frustrated and thought of even selling the blog before the traffic completely goes down.
Decided to Revert Back to Old Theme:
Finally I decided to check if its the template which triggered the decline in ranking and reverted back to my old template.I had a proper backup of the old template.So it was very easy for me to revert back without much effort.
Results after Reverting back to Old Template:
Within the next 4 hours after I reverted back to old template the lost ranking started coming back to normal.After 24 hours all the keywords were back to their normal position and traffic back to normal. Those two weeks of traffic downfall were horrible as I have only one active blog this time .So a traffic down fall will lead to decline in earnings as well.
Some Common Questions:
Does Template/Theme Effect Blog Ranking?
Yes it does.
There are many factors that helps in better ranking of a blog in search engines like better indexing ,good page rank distribution with in the blog,Optimized Title and Header Tags etc.
I will be discussing more about how to choose an optimized theme in a separate article.
How to Choose a Proper Template/Theme Design for your blog?
Only use themes or templates which are designed by trusted or popular designers.
Keep it simple and neat.
Avoid too many javascripts. Javascripts not only effects the loading time but also effects the indexing of your blog in Google.
Take a basic theme and start customizing it:- If you have basic idea of css and html instead of going for ready made themes start with a basic theme and customize it to your need.Basic templates which are available in Blogger Dashboard are SEO optimized by default.
Will we upgrade to a new Template in future?
The answer is No.
We already took all the risk on our sholders and tested many templates and found out that the template which we are using currently is the best and SEO Optimized template.I worked on this template for almost an year optimizing it for search engines and users.So I feel that this template is the best template so far.This template is designed by modifying devils workshop blogger template which is readily available to download.If you need the current template then you have to contact me.I agree the fact that the current template is little heavy and takes couple of more seconds to load.We are constantly working on to reduce the loading time.
Conclusion:
Its very clear that a Template or Theme can impact huge on your blog.I suggest you to try few different templates and test each of the performace for a week or two on your blog.You will definitely notice a fluctuation in rankings.Use the one which improves your ranking and traffic and customize it to your need.
If you need any suggestions regarding template selection or template designing you can always contact me,I can design a good SEO optimized theme for your blog.
Due to the different layers of transmission and storage, each video has its own set of formats to choose from. Technical development comes up with more and more video formats, on one hand, satisfying us who have different requirements towards a certain video, on the other hand, leading us a more frequent use of video converter. In this post, Apowersoft Free Online Video Converter, one of the most talked about converter will be shared in details.
The Application Appearance:
Apowersoft Online Video Converter provides you a simple and easy-to-use interface, with eye-protected cool color. No ads, plug-in and additional web links, the app gives you a very clear idea on how to operate it. With it, a newbie could convert video online for his or her first time without any troubles.
How it Works
The way that a program works, to a large extent, decides its value and popularity among users. Exactly, the way of Apowersoft Free Online Video Converter contributes its bigger and bigger fame. The app is able to free convert video, but has no limitations on conversion time. No downloading and registering, it provides web-based services, allowing you to finish conversion with three steps. All you have to do is to add local file, choose output format and click Convert button, then, video will be converted in a few minutes.
You can enjoy the demo video of Apowersoft Online Video Converter below.
Various Output Formats
To a video converter, various output formats stand for its worthiness to users. As to Apowersoft Free Online Video Converter, what I like most is that it has a wide range of outputs formats even as a free application. It has video formats including MP4, MOV, WMV, MKV, AVI, 3GP and so on. As well, it supports audio formats including MP3, WMA, WAV, ACC, OGG and so on.
The Output Quality
There exists programs that are free but has discounts on conversion quality. But, I realized that such hoaxes could not happen on Apowersoft Free Online Video Converter as it has successfully converted videos in a way that I wanted for many times. The app outputs high quality videos or audios. Instead of worrying about wasting time but getting a poor converted video, you would get a 1:1 quality video at the simple process of conversion. What’s more, you can modify video by setting resolution, bitrate and frame rate on the step two of the conversion process.
Considerate Services
On the webpage, there are four tabs below the application, which are Overview, Video Demo, Tips to Use and Testimonials. So, any user can get a very closer look on the app. Regardless of what a simple application it is, Apowersoft staff still provides you with video demo to give you a better thought on the app. In addition, you can post the problem you may encounter to the Apowersoft technical support. They are nice and will deal with your case promptly as far as I know. All in all, I give Apowersoft Free Online Video Converter two thumbs up!
As you all know after Google Page rank the factor that decides the popularity of a blog or website is its Alexa Rank.We have already discussed the importance of alexa rank and some killer tips to increase alexa rank as well.In this article we will be explaining Alexa Widget on your website.
Why to Install Alexa Widget?
The primary reason behind installing Alexa Badge on your site is to increase your alexa rank fast.
The other reason is to showcase the alexa rank of your blog to attract more advertisers.
Steps To Install Alexa Badge on your Site:
Alexa Widget installation is pretty much straight forward.
VSDIF is rated the best duplicate image finder on major photography sites, software magazines and technology Blogs. CNet - the largest download site on the web has rated the tool "Outstanding". What makes Visual Similarity Duplicate Image Finder better than other tools?
The name clearly denotes that the tool can find similar and duplicate photos based on content analysis. The advanced content analysis algorithm makes it possible to find similar photos regardless of the image format, size, dimensions, colors and other image attributes. This means that VSDIF can find copies of the same image with modifications applied. Such modifications include color correction, crop, retouching, change of file format or watermarks. Finding similar images is a task that a common duplicate file finder can not handle. More than 100 common image formats including Photoshop PSD, plus over 300 RAW camera formats are supported.
The main three benefits from using Visual Similarity Duplicate Image Finder are:
Organize photo collections
Save valuable disk space by removing duplicate images
Search for similar images inside image collection by loading a sample image
The new cache system makes it possible to process large image collections extremely fast. While analyzing the image data VSDIF can collect it in a cache file that will be reused in consequential scans. If a photo is edited it will be re-processed automatically and the updated version will be used for the comparison even when using the cache system.The Google-like "Image Search" functionality can find similar images in your own photo collection. The Image Search together with the cache system makes it possible to find similar images inside 10 000 photos in seconds. A FREE demo is available for download at the company's web site.
MindGems Inc. also provides popular FREE Duplicate File Finder tool that will help with the disk cleanup process.
Alexa Rank is one of the most over rated term when it comes to judge quality of a blog/website.Most of the bloggers and Webmasters are obsessed with Alexa Rank.
So, What is Alexa Rank?
Alexa defines themselves as web information company and it is owned by Amazon Inc.
Alexa Rank gets updated on regular basis.
They rank every website based upon a specific algorithm.
Alexa ranking algorithm is very much peculiar.They only count those hits which pass through their system.That means they only count those visitors who have installed alexa toolbar in their browser.
So if a website has good alexa rank doesn't mean that it has good traffic.It only mean that it has good number of visitors who have installed alexa toolbar in their browsers(Mostly Techy Guys)
Generally alexa rank will be higher for the websites which are related to Blogging ,Technology , Design etc.
Should you really bother about Alexa Rank?
Again it depends upon your own perspective.
If you want to attract more advertisers to your blog and earn more then alexa rank is crucial.
Generally advertisers look for blogs with good alexa rank.So if your blog has good alexa rank then chances of getting direct advertisement are more.
If you depend only on Traditional Advertising like Adsense and Textual Advertising then you should not really bother about Alexa Rank.
As already said Alexa has nothing to do with your traffic and search engine ranking.Your search ranking are neither shows a positive impact nor negative impact as well.So if your alexa is lower than other website then you need not worry about the search ranking or search traffic.
Do you want to Increase your Blog/Website Alexa Rank?
Increasing alexa rank of your website is not that tough.You can easily by following few simple tips.I already wrote an article on complete guide to increase alexa ranking do check it out.
Conclusion:
If you want to build a website to earn more and attract more advertisers to your website then alexa rank is very crucial but if you want to build a website which serves only traditional type of ads as mentioned above like Google Adsense then you can completely ignore Alexa Rank. Let us know whats your take on this in your comments.
Remember the situation, signing into your account with just a single click because browser is saving all your passwords for you. We know this is convenient but since you’re not typing your passwords any-more, eventually you’ll forget your password in a few days. For security reasons, the password field in all browsers is masked with “asterisks” which won’t allow any third person (even you) to read the origi-nal typed password. But, what if you want to reveal the string behind the asterisks? There is actually few workaround for revealing the original passwords behind the asterisk and over the entire course of this article we’ll be discussing some known ways to reveal the characters behind the asterisks in different browsers.
Reveal Passwords Behind Asterisks or Dots in Different Web Browsers:
Google Chrome:
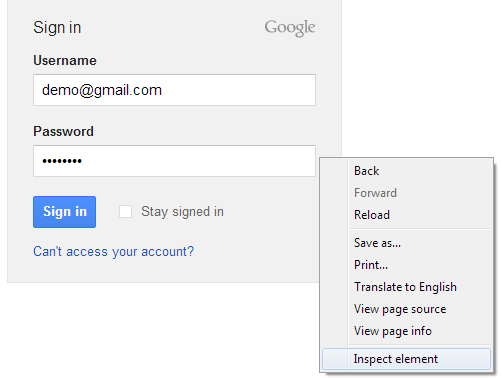
Starting off with Google chrome, the easiest way to reveal the original passwords behind the asterisk is using inbuilt Inspect element feature in the browser.
You just need to right click on the password field in the browser where you will get an option "Inspect Element".
After clicking on it, "Web Inspector" will open out and there you can see some code which is basically Html code and you just need to replace the "password" word with "text" word and it will reveal the words behind the asterisks.
There’s another way using JavaScript which is quite quick and easy as compared to above method. Just open a site that allows users to login and after typing the password, just enter the following JavaScript code in the address bar.
After entering the above code in the address bar, press enter and it will pop up a window with your password written on it.
Mozilla Firefox:
The Next most common browser is "Mozilla Firefox".
The chrome's "Web Inspector" trick is also applicable in Firefox.
Open a site that asks for login (like Facebook), right click on the password field in the browser where you will get an option "Inspect Element". After clicking on it, "Web Inspector" will open out and there you can see some code which is basically Html code and you just need to replace the "password" word with "text" word and it will reveal the words behind the asterisks as shown in screenshot below.
Apart from this, there’s another way which is quite quick and easy as compared to above method. For that you’ve to create a bookmark with the following JavaScript code as URL in it.
After saving this as a bookmark, open a site that allows users to login and after typing the password, open the saved bookmark by clicking on it and it will pop up a window with your password written on it.
Opera:
Next comes the "Opera" in that you can use "Dragonfly", which is an in built tool, to reveal the words behind the asterisks just like chrome's "Web Inspector". Open a site that asks for login (like Facebook), right click on the password field in the browser and select "Inspect Element" option. After clicking on it, "Dragon Fly" will open out and you’ll see some code which is basically Html code and you just need to replace the "password" word with "text" word and it will reveal the words behind the asterisks as shown in screen shot below.
Internet Explorer:
In the same manner you can apply this trick on Internet explorer. First of all open any site (Gmail in our case) that allows user login. Now for bringing out “developer tools” press the f12 key. A new window will be opened and press Ctrl+B to enable selection of elements. After that go to login page and select the password field, doing this will take you to the password field’s code in developer window (highlighted by yellow). Now, you just need to replace the "password" word with "text" word and it will remove the asterisk mask in the password field, see screenshot below.
Apart from this, there’s another way which is quite quick and easy as compared to above method. Just open a site that allows users to login and after typing the password, just enter the following JavaScript code in the address bar.
alert(document.getElementById('Passwd').value);
After entering the above code in the address bar, press enter and it will pop up a window with your password written on it. (See pic below)
Wrap Up:
Although there are so many tools out there to help you in revealing the words behind the asterisks and to get the saved passwords with in a browser, you still need to keep your system safe and protected by using "Antivirus" plus "Firewall" to avoid stealing of these passwords by someone who have access to your system. If you can use these tools to reveal your saved passwords then others can also use the same ways to get information of yours.
We have shared many awesome and unique blogger Templates.Now we came up with a new and unique blogger template design with infinite scrolling effect.This infinite scrolling effect can be seen on many popular websites like Mashable.Generally these kind of layouts are seen on wordpress blogs.Now you can implement this kind of layout on Blogger/Blogspot Blogs as well. Features of the Template:
Customizing the template is pretty much straight forward.All you have to do is to edit menu bar in your Template design and replace them with your own Categories.
Note:Please note that we are giving this Template for free.We don't want anything from you but please don't remove the link in the footer.
If you are facing any trouble either with downloading or with customizing do comment here we will help you out.
If any of the above questions is true then you must fight against duplicate content issue within the site.I already wrote a article on how to identify and remove low quality content from google but in this article we will be discussing how to fix this issue permanently.Duplicate content within the site is a big issue and most of the bloggers are not aware how to fix it.Even my blog ranking got lowered with duplicate content issue after moving to responsive theme.
How to Identify Duplicate Content:
Go to Google and search for site:yoursite.com.
This will show up the list of all the pages that are indexed in google.
Site:alltechbuzz.net
Some times you may notice mobile version of pages and search results getting indexed in Google as follows.
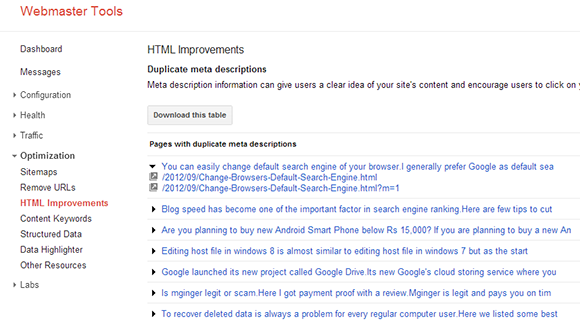
Now navigate to Optimization then HTML Improvements.
There you can find the list of all Duplicate Content.
Duplicate Content in Webmaster Tool
The most commonly faced problem is Duplicate Meta Description.In this article I will be explaining how to deal with this issue.
How to Fix Duplicate Content Issue?
Fixing duplicate content is a very big task and you must take care that this content wont get indexed again in future as well.
Remove Duplicate URL's from Google:
First and the foremost thing you have to do is to completely remove all the duplicate content from Google Index.To do this just follow the below steps.
Go to Google.com and search for site:yoursite.com
Now this will list you all the list of urls that are indexed in Google.
Find the urls that are ending with wrong extension like ?m=1 ,?m=0 etc.
Now open that page and copy the url of that particular page.
Then go to your webmaster tools then navigate to Optimization then Remove URL'S.
Then click on Create New URL Removal Request.
Then paste the url there and then submit.
When Google indexes your website for the next time those submitted urls must be disappeared from search results.
Step to Avoid Duplicate Content Getting Indexed in Google in Future:
After you are done with removing all the duplicate urls you have to make sure that these removed urls wont gets indexed in future as well.
What does this code do?
This code makes Google to index only those pages ending with ".html" and it blocks all those pages which are ending with urls like ".html?m=1" and ".html?m=0" etc.
Configuring URL Parameters in Google Webmaster Tools:
This step is optional.Avoid it if you are not confident enough to configure Webmaster Settings.
Google Webmasters provides an additional feature to configure url parameters that gets indexed in Google.Use this with precautions or else your whole website might get de-indexed.
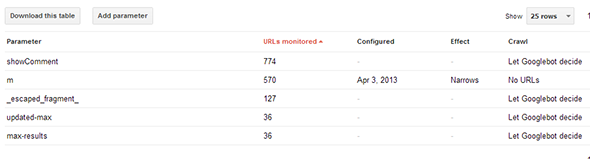
In Webmaster Tools navigate to Configuration then URL Parameters.
You can see the url parameters as follows.
URL Parameters in Webmaster Tools
By default Google sets certain crawl value for each of these parameters.
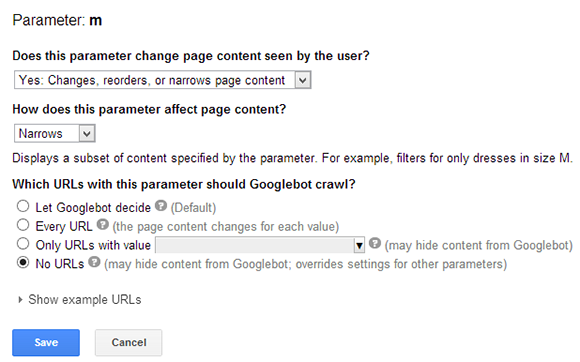
Now the main issue is with mobile version parameter which is "m".
Click on edit and follow the settings shown below in the screenshot and save those settings.
Mobile Parameter Settings
Though I configured url parameters using Google Webmaster Tool it doesn't seem to work in most of the cases.So it is suggested to follow the below methods as well.
Changing Robots.txt File:
Note:This is only for Advanced users.Use this only if you are using responsive theme or use this only if you are not able to fix this duplicate content issue after following all the other steps.
Open your Blogger Dashboard.
Then go to Settings then Search Preferences.
In Search Preferences enable custom robots.txt which will be disabled by default.
In the above code replace www.alltechbuzz.net with your website url then save it.
Custom Robots Header:
This is one more advanced feature provided by Blogger and must be used with proper care or else your blog might get completely deindexed from google.
Open blogger dashboard then Settings then choose Search Preferences.
Enable Custom Robots header Tags which is disabled by default and follow the below settings show in the screenshot.
Custom Robots Header for Blogger/Blogspot
If you are done with all the settings then save the settings to get into effect.
Conclusion:
If you are done with all the above steps then I am sure there wont be any duplicate content indexed in Google and you wont be facing this issue in future as well.
If you have any doubts then you can use the comment form below to ask your questions.